PRTG Manual: Notification Templates
On the Notification Templates tab, you can define and edit user account-specific notifications. You can use notification templates to trigger notifications for specific sensor states and values.
This documentation refers to an administrator that accesses the PRTG web interface on a master node. Other user accounts, interfaces, or failover nodes might not have all of the options in the way described here. In a cluster, note that failover nodes are read-only by default.
If 15 minutes (900) seconds have passed since your last credential-based login and you open a setup page from a different setup page, PRTG asks you to enter your credentials again for security reasons. A dialog box appears. Enter your Login Name and Password and click OK to continue.
In this section:
- Note
- Overview
- Notification Template Settings
- Basic Settings
- Notification Summarization
- Access Rights
- Notification Methods
You must take the following four steps to set up and use notifications:
- Check and set up the notification delivery settings if you use PRTG Network Monitor. These settings define how PRTG sends messages.
- Check and set up notification contacts for the user accounts. These contacts define the recipients to which PRTG sends notifications.
- Check and set up several notification templates. These templates define the notification methods and their content.
You can also check or edit notification templates via the Notification Triggers tab. For more information, see section Notification Triggers Settings.
- Check and set up notification triggers settings for objects. These triggers define when PRTG sends notifications.
Usually, there are three successive attempts to deliver a notification. If all of these attempts fail, the notification is lost. To never miss a notification, we recommend that you always set up at least two notifications with different notification methods for a notification trigger, for example, one email notification and one SMS notification. If delivery via email fails, PRTG can still notify you via smartphone as a fallback. For example, use the latency setting of a state trigger to choose a notification with a different notification method than in the first trigger condition, or set up a second trigger with a different notification method for the corresponding object.
For a detailed step-by-step guide, see the Paessler website: How to set up notifications via the PRTG web interface.
Custom notification scripts are also available in the PRTG Sensor Hub.
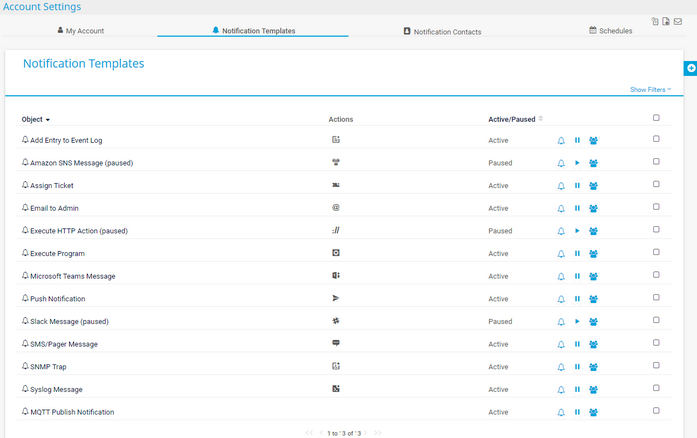
Click the Notification Templates tab to show a list of all notification templates, what actions they perform, and their status (active or paused). To edit a notification template, enable the checkbox next to the notification template and choose from the following options.
Option |
Description |
|---|---|
Send test notification ( |
This sends the notification immediately for testing purposes.
|
Used by ( |
Show all objects that trigger the notification. |
Pause ( |
Pauses the notification.
|
Resume ( |
Resumes the notification. |
Clone ( |
Creates a clone of the notification. |
Delete ( |
Deletes the notification.
|
Settings ( |
Opens the settings of a notification template. |
You can also use the quick action buttons Send test notification (
![]() ), Used by (
), Used by (![]() ), Pause (
), Pause (![]() ) or Resume (
) or Resume (![]() ) next to the status of a notification template.
) next to the status of a notification template.
See also sections Working with Table Lists and Multi-Edit.
Notification Template Settings
Hover over ![]() and select Add Notification Template from the menu to add a new notification template. You can also click the name of a notification template to edit it.
and select Add Notification Template from the menu to add a new notification template. You can also click the name of a notification template to edit it.
When a user with administrative rights creates a new object, only other users with administrative rights can view or edit the new object by default. When a read/write user creates a new object, all members of the read/write user's primary group can view and edit the new object as well. This behavior applies to libraries, maps, reports, notification templates, and schedules. For more information, see section Access Rights Management.
Setting |
Description |
|---|---|
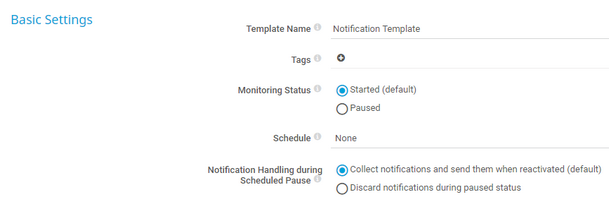
Template Name |
Enter a name to identify the notification template.
|
Tags |
Enter one or more tags. Confirm each tag with the Spacebar key, a comma, or the Enter key. You can use tags to group objects and use tag-filtered views later on. Tags are not case-sensitive. Tags are automatically inherited.
|
Status |
Select the status of the notification template:
|
Schedule |
Define if you want to use a schedule to activate a notification template only during specific time spans:
|
Notification Handling during Scheduled Pause |
Define how PRTG handles notifications that are triggered during a scheduled pause:
|
Setting |
Description |
|---|---|
Method |
Define if and how PRTG collects and summarizes several notifications into one or more messages with a maximum of 1,000 characters:
|
Subject for Summarized Email or SNS Messages |
Define a subject that PRTG includes when it sends summarized notifications. The default subject is [%sitename%] %summarycount Summarized Notifications.
|
Time Span for Summarizing Messages (in Minutes) |
Define a time span in minutes to define how long PRTG collects notifications for summarization. Enter an integer.
|
Setting |
Description |
|---|---|
User Group Access |
Define the user groups that have access to the notification template. You see a table with user groups and group access rights. The table contains all user groups in your setup. For each user group, you can choose from the following group access rights:
|
With the following settings, you can add one or more methods for how PRTG sends out a notification message. You can choose one method or combine several methods. Whenever the notification is triggered, PRTG sends out messages or performs actions for all configured methods at once.
To select a notification method, click ![]() in front of it. You can then see and set the options as described in this section. The following notification methods are available:
in front of it. You can then see and set the options as described in this section. The following notification methods are available:
Some notification types are only available for PRTG Network Monitor (marked with
). You cannot use these with PRTG Hosted Monitor.
- Send Email
- Add Entry to Event Log
- Send SMS/Pager Message
- Execute HTTP Action
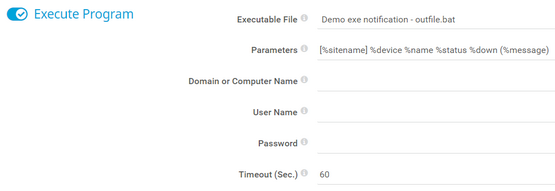
- Execute Program
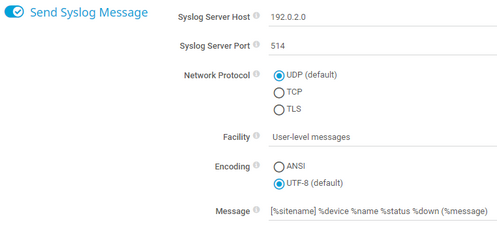
- Send Syslog Message
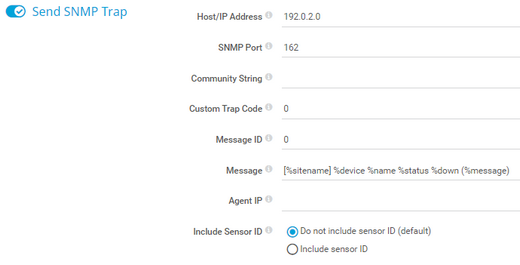
- Send SNMP Trap
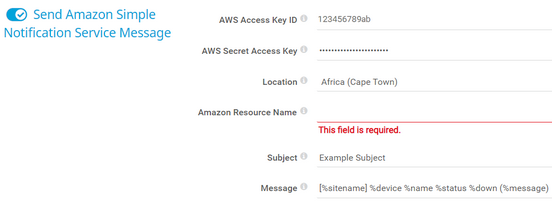
- Send Amazon Simple Notification Service Message
- Assign Ticket
- Send Push Notification
- Send Microsoft Teams Message
- Send Slack Message
- Send MQTT Publish Notification
- Send OPC UA Notification
This notification method uses notification contacts to deliver the email notifications. Set up notification contacts in advance in the Notification Contacts settings.
Setting |
Description |
|---|---|
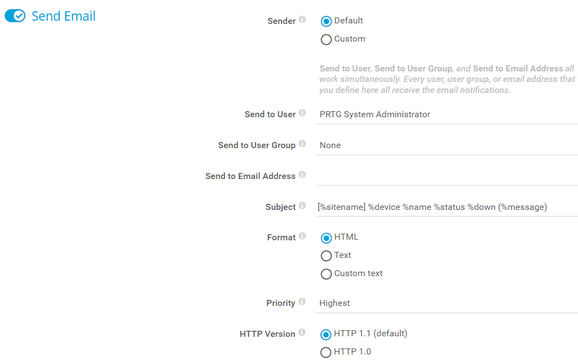
Sender |
Define which sender email address and sender name appear in the FROM part of the email notifications:
|
Sender Email Address |
This setting is only visible if you select Custom above. Enter an email address to use as the sender of the email notifications.
|
Sender Name |
This setting is only visible if you select Custom above. Enter a sender name to use as the sender of the email notifications.
|
Send to User |
Select a user account to send the email notifications to. PRTG sends the email notifications to every active email notification contact for this user account. Leave None to not use this option.
|
Send to User Group |
Select a user group to send the email notifications to all members of this user group. PRTG sends the email notifications to every active email notification contact of every user in the user group. Leave None to not use this option.
|
Send to Email Address |
Enter one or more email addresses to which PRTG sends the email notifications. If you enter more than one email address, separate them with commas. Leave this field empty to only send email notifications to the email notification contacts of the user or to the members of the user group you choose above.
|
Subject |
Enter the subject of the email notifications. The default subject is [%sitename] %device %name %status %down (%message).
|
Format |
Define the kind of email that PRTG sends when the notification is triggered:
|
Custom Text |
This setting is only visible if you select Custom text above. Enter the desired message for this email notification in plain text format. You can use placeholders here.
|
Priority |
Define the priority that PRTG sets for the email:
|
HTTP Version |
Define the HTTP version that PRTG uses to send the email:
|
This option is not available in PRTG Hosted Monitor.
Setting |
Description |
|---|---|
Log File |
Define the log file to which PRTG adds an event:
|
Event Source |
This setting is only visible if you select Application above. Enter the source for the event. This is usually the name of the application. |
Event Type |
Select the type of the event:
|
Message |
Define the message that PRTG writes in the event log. The default message is [%sitename] %device %name %status %down (%message).
|
You must first set up this notification method in the Notification Delivery settings.
This notification method uses notification contacts to deliver the SMS/pager messages. Set up notification contacts in advance in the Notification Contacts settings.
This notification method uses the central proxy settings that you define for the PRTG core server. For more information, see section Core & Probes (section Proxy Configuration).
Setting |
Description |
|---|---|
Send to User |
Select a user account from the dropdown list. PRTG sends the SMS/pager message to every SMS notification contact for the user account. Leave None to not use this option. |
Send to User Group |
Select a user group from the dropdown list. PRTG sends the SMS/pager message to every SMS notification contact for every member of the user group.Leave None to not use this option.
|
Send to Phone Number |
Enter a phone number to send the SMS/pager message to. If you enter more than one phone number, use commas as separators.
|
Message |
Define the SMS/pager message. The default message is [%sitename] %device %name %status %down (%message).
|
HTTP Version |
Define the HTTP version that PRTG uses to send the SMS/pager message:
|
Regardless of the Notification Summarization method that you use, PRTG always sends notifications of the type Execute HTTP Action immediately. PRTG never summarizes them.
This notification method uses the central proxy settings that you define for the PRTG core server. For more information, see section Core & Probes (section Proxy Configuration).
For more information, see section Custom Notifications. You can find ready-to-use custom notifications in the PRTG Sensor Hub, see below.
Setting |
Description |
|---|---|
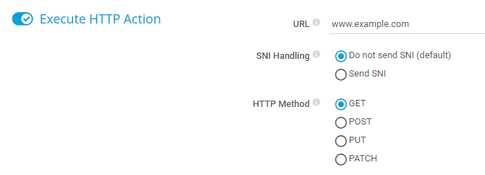
URL |
Enter the URL that PRTG sends the request to.
|
SNI Handling |
Define if PRTG sends the Server Name Indication (SNI) extension to the Transport Layer Security (TLS) protocol along with the HTTP request:
|
SNI Name |
This setting is only visible if you select Send SNI above. Enter the SNI name that the endpoint configuration requires. Usually, this is the fully qualified domain name (FQDN) of the virtual host. |
HTTP Method |
Select the HTTP method that the notification uses:
|
Payload |
This setting is only visible if you select POST, PUT, or PATCH above. Enter a payload. The payload is the data that PRTG transmits to the URL.
|
HTTP Version |
This setting is only visible if you select POST above. Select the HTTP version that PRTG uses to execute the HTTP action:
|
Regardless of the Notification Summarization method that you use, PRTG always sends notifications of the type Execute Program immediately. PRTG never summarizes them.
To remotely run PowerShell scripts, make sure that you set the according Execution Policy. For more information, see the Knowledge Base: PowerShell 32 bit and 64 bit and Execution Policy
For more information, see section Custom Notifications. You can find ready-to-use custom notifications in the PRTG Sensor Hub, see below.
This option is not available in PRTG Hosted Monitor.
Setting |
Description |
|---|---|
Executable File |
Select an executable file from the list. PRTG runs it every time the notification is triggered.
|
Parameters |
Enter the parameters that the notification passes to the executable. For example, if you use a batch file that contains a %1 variable, you can provide a value for this variable. The default parameters are [%sitename] %device %name %status %down (%message).
|
Domain or Computer Name |
Enter a Windows authority if you want to use a different security context for the program than the security context of the PRTG core server. |
User Name |
Enter the user name for Windows access. |
Password |
Enter the password for Windows access. |
Timeout (Sec.) |
Enter a timeout in seconds. After this time passes, PRTG stops the process if it is still running. Enter an integer. |
This option is not available in PRTG Hosted Monitor.
Setting |
Description |
|---|---|
Syslog Server Host |
Enter the IP address or the Domain Name System (DNS) name of the system that runs the syslog server.
|
Syslog Server Port |
Enter the port that PRTG sends the syslog messages to. The default port is 514. PRTG supports ports 1- 65535. |
Network Protocol |
Define the network protocol PRTG uses for the syslog connection:
|
Repeated Delivery |
This setting is only visible if you select TCP or TLS above. Define if PRTG attempts to redeliver the syslog message if it cannot reach the syslog server:
|
Server Certificate Verification |
This setting is only visible if you select TLS above. Define if PRTG validates the syslog server certificate:
|
Certificate Authority Handling |
This setting is only visible if you select Verify server certificate (default) above. Define where PRTG finds the syslog server certificate.
|
Syslog Server Certificate |
This setting is only visible if you select Specify a certificate authority server certificate above. Select a CA server certificate to use for the TLS connection validation. This file must match the CA server certificate that you used to set up the syslog server.
|
Client Authentication |
This setting is only visible if you select TLS above. Define if you want to authenticate your system with a client certificate.
|
Client Certificate Handling |
This setting is only visible if you select Authenticate with a client certificate above. Define where PRTG finds the client certificate and client certificate key:
|
Client Certificate Identification |
This setting is only visible if you select Use system certificate store (default) above. Define which identification PRTG uses to find the client certificate in the system certificate store:
|
Friendly Name |
This setting is only visible if you select Use the certificate's friendly name above. Enter the friendly name of the client certificate.
|
Thumbprint |
This setting is only visible if you select Use the certificate's thumbprint above. Enter the thumbprint of the client certificate. |
Client Certificate |
This setting is only visible if you select Enter a client certificate above. Enter the client certificate.
|
Client Certificate Key |
This setting is only visible if you select Enter a client certificate above. Enter the client certificate key.
|
Client Certificate Key Password |
This setting is only visible if you select Enter a client certificate above. Optionally, enter the password for the client certificate key. |
Test Connection |
This setting is only visible if you select TCP or TLS above. Click Test Connection to test the connection to the syslog server endpoint using the current parameters. |
Facility |
Define the facility of the syslog messages:
|
Encoding |
Define the encoding of the syslog messages that PRTG sends to the syslog receiver:
|
Message |
Define the syslog message. The default message is [%sitename] %device %name %status %down (%message).
|
Syslog Message Severity Status
Depending on the status of the sensor that triggers the syslog notification, PRTG automatically sets the Severity level of the syslog messages.
Status |
Severity level |
|---|---|
|
Notice (5) |
|
Warning (4) |
|
Error (3) |
For more information about the object identifiers (OID) that PRTG uses in the content of the Simple Network Management Protocol (SNMP) traps, see the Knowledge Base: Is it possible to send SNMP traps using PRTG?
This option is not available in PRTG Hosted Monitor.
Setting |
Description |
|---|---|
Host/IP Address |
Define the IP address or DNS name of the system that runs the trap receiver.
|
SNMP Port |
Enter the port on which PRTG sends trap messages. The default port is 162. |
Community String |
Enter the community string of the device. The default community string is public. Enter a string or leave the field empty. |
Custom Trap Code |
Enter a code to identify the purpose of the trap. The default trap code is 0. Enter an integer. |
Message ID |
Enter an ID to identify the origin of the trap.Enter an integer. PRTG sends it on the OID 1.3.6.1.4.1.32446.1.1.1. |
Message |
Define the trap message.
|
Agent IP |
Define the IP address of the agent. Leave this field empty to use the IP address of the PRTG web server. |
Include Sensor ID |
Define if PRTG should include the sensor ID of the sensor that triggers the notification:
|
Send Amazon Simple Notification Service Message ![]()
Setting |
Description |
|---|---|
AWS Access Key ID |
Enter your access key ID from aws.amazon.com. Enter a string. |
AWS Secret Access Key |
Enter your secret access key from aws.amazon.com. Enter a string. |
Location |
Define the location of your Amazon service:
|
Amazon Resource Name |
Enter the Amazon resource name. Enter a string. |
Subject |
Enter the subject of the Amazon Simple Notification Service (SNS) message. Enter a string.
|
Message |
Define the SNS message. The default SNS message is [%sitename] %device %name %status %down (%message).
|
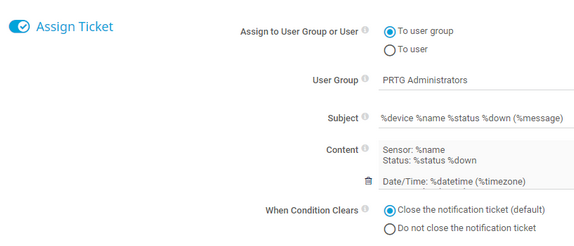
Regardless of the Notification Summarization method that you use, PRTG always sends notifications of the type Assign Ticket immediately. PRTG never summarizes them.
For more information about the ticket system, see section Tickets.
Setting |
Description |
|---|---|
Assign to User Group or User |
Specify whether to assign the notification ticket to a user group or to a single user:
|
User Group |
Select the user group to which PRTG assigns the notification ticket.
|
User |
Select the user to which PRTG assigns the notification ticket.
|
Subject |
Enter the subject of the notification ticket. The default subject is %device %name %status %down (%message).
|
Content |
Enter the message of the notification ticket. The default message is Sensor: %name Date/Time: %datetime (%timezone) Probe: %probe Last Scan: %lastcheck
|
When Condition Clears |
Define how PRTG handles the notification ticket when the defined trigger condition clears:
|
Push notifications only work with the apps PRTG for Android and PRTG for iOS. You must activate push notifications in the settings of the app first. For more information about the setup, see the Knowledge Base: How can I use push notifications with PRTG?
This notification method uses notification contacts to deliver push notifications. Set up notification contacts in advance in the Notification Contacts settings.
The PRTG core server needs to communicate with the PRTG Cloud on port 443 to send push notifications. It uses https://api.prtgcloud.com:443, which is the same as for the Cloud HTTP v2 sensor, the Cloud Ping v2 sensor, and support tickets.
Send to User and Send to User Group both work simultaneously. Because of this, you can define more than one user as a recipient of push notifications. PRTG sends push notifications to the active push notification contacts of the user that you select, and to the active push notification contacts of all members of the user group that you select.
Setting |
Description |
|---|---|
Send to User |
Select the user that PRTG sends push notifications to. PRTG sends the push notifications to each active push notification contact of the user. Leave None to not use this option.
|
Send to User Group |
Select the user group that PRTG sends push notifications to. PRTG sends the push notifications to each active push notification contact of every member of the group. Leave None to not use this option.
|
Message |
Define the message of the push notification. The default message is [%sitename] %device %name %status %down (%message).
|
HTTP Version |
Define the HTTP version that PRTG uses to send the push notification:
|
Regardless of the Notification Summarization method you use, PRTG always sends notifications of the type Send Microsoft Teams Message immediately. PRTG never summarizes them.
Setting |
Description |
|---|---|
Teams Webhook URL |
Enter the URL of the incoming webhook that you set up in your Microsoft Teams channel.
|
Title |
Enter the title of the Microsoft Teams notification. The default title is %device: %name.
|
Subtitle |
Enter the subtitle of the Microsoft Teams notification. The default subtitle is %message.
|
Content |
Define the content of the Microsoft Teams notification:
|
Custom Content |
This setting is only visible if you select Define custom content above. Enable the checkboxes in front of content that you want PRTG to include in the Microsoft Teams notifications. Disable the checkboxes in front of the content that you do not want to include. The following types of monitoring information are available:
|
Regardless of the Notification Summarization method you use, PRTG always sends notifications of the type Send Slack Message immediately. PRTG never summarizes them.
Setting |
Description |
|---|---|
Slack Webhook URL |
Enter the URL of the incoming webhook that you set up in your Slack workspace.
|
Sender Name |
Enter a sender name to use as the sender of Slack notifications.
|
Title |
Enter the title of the Slack notifications. The default title is %device: %name.
|
Subtitle |
Enter the subtitle of the Slack notifications. The default subtitle is %message.
|
Content |
Define the content of the Slack notifications:
|
Custom Content |
This setting is only visible if you select Define custom content above. Enable the checkboxes in front of the content that you want PRTG to include in the Slack notifications. Disable the checkboxes in front of the content that you do not want to include. The following types of monitoring information are available:
|
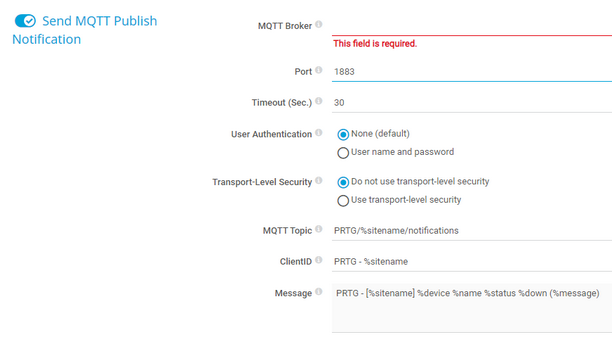
Send MQTT Publish Notification
Regardless of the Notification Summarization method you use, PRTG might not send notifications of the type Send MQTT Publish Notification immediately.
Setting |
Description |
|---|---|
MQTT Broker |
Enter the address for the connection to the MQTT broker (server). |
Port |
Enter the port for the connection to the MQTT broker. The default port for secure connections is 8883 and the default port for unsecure connections is 1883. |
Timeout (Sec.) |
Enter a timeout in seconds for the request. Enter an integer. The maximum timeout value is 300 seconds (5 minutes). |
User Authentication |
Select if you want to connect without credentials or define credentials for access to the MQTT broker:
|
User Name |
Enter the user name for access to the Message Queue Telemetry Transport (MQTT) broker. |
Password |
Enter the password for access to the MQTT broker. |
Transport-Level Security |
Select if you want to use a Secure Sockets Layer (SSL)/Transport Layer Security (TLS) secured connection:
|
Server Authentication |
This setting is only visible if you select Use transport-level security above. Select if you want to use a certificate for server authentication:
|
CA Certificate |
Enter the certificate authority (CA) certificate for the verification of the MQTT broker.
|
Client Authentication |
This setting is only visible if you select Use transport-level security above. Select if you want to use a certificate for client authentication:
|
Client Certificate |
Enter the certificate that you created for authenticating the sensor against the MQTT broker.
|
Client Key |
Enter the client key for access to the MQTT broker.
|
Client Key Password |
Enter the password for the client key certificate. |
MQTT Topic |
Enter the topic for the MQTT publish notifications. The default topic is PRTG/%sitename/notifications.
|
ClientID |
Enter the ClientID for the connection to the MQTT broker (server). The default ClientID is PRTG - %sitename. |
Message |
Define the message of the MQTT publish notifications. The default message is PRTG - [%sitename] %device %name %status %down (%message).
|
Setting |
Description |
|---|---|
OPC UA Server |
Enter the address for the connection to the OPC Unified Architecture (OPC UA) server. |
Port |
Enter the port for the connection to the OPC UA server. The default port for secure connections is 4843. The default port for unsecure connections is 4840. |
Server Path |
Enter the path of the OPC UA server endpoint if you run more than one server under the same IP address or DNS name. |
NodeID |
Enter the NodeID for the OPC UA notification. PRTG writes the data that you define below to the specified NodeID. |
Timeout (Sec.) |
Enter a timeout in seconds for the request. |
Security Mode |
Select if you want to use encryption:
|
Security Policy |
This setting is only visible if you select Sign or Sign & Encrypt above. Select if you want to use a security policy and define which policy you want to use:
|
Client Certificate |
This setting is only visible if you select Sign or Sign & Encrypt above. Enter the certificate that you created for authenticating the sensor against the OPC UA server.
|
Client Key |
This setting is only visible if you select Sign or Sign & Encrypt above. Enter the client key for access to the OPC UA server.
|
Client Key Password |
This setting is only visible if you select Sign or Sign & Encrypt above. Enter the password for the client key. |
Authentication Method |
Select if you want to connect without credentials or define credentials for access to the OPC UA server:
|
User Name |
This setting is only visible if you select User name and password above. Enter the user name for access to the OPC UA server. |
Password |
This setting is only visible if you select User name and password above. Enter the password for access to the OPC UA server. |
Data Type |
Select the type of the data that PRTG sends:
|
Boolean |
This setting is only visible if you select Boolean above. Select the Boolean value that PRTG sends:
|
Int64 |
This setting is only visible if you select Int64 above. Enter the 64-bit integer that PRTG sends.
|
Double |
This setting is only visible if you select Double above. Enter the double value that PRTG sends.
|
Save your settings. If you change tabs or use the main menu without saving, all changes to the settings are lost.
In addition to the standard notifications, you can also create custom notifications. To do so, write a script or a program and use it with an Execute Program notification or an Execute HTTP Action notification. There are also many free scripts, plugins, and add-ons for PRTG in the PRTG Sensor Hub.
For information about the Comments and History tabs, see section Object Settings.
KNOWLEDGE BASE
What security features does PRTG include?
PowerShell 32 bit and 64 bit and Execution Policy
Is it possible to send SNMP traps using PRTG?
How can I use push notifications with PRTG?
How do I create a webhook for the PRTG Notifications to Slack and Microsoft Teams?
Which audible notifications are available in the PRTG web interface and in the PRTG app for desktop?
How do I troubleshoot erratic behavior of push notifications in the PRTG app for desktop or PRTG apps?
PAESSLER WEBSITE
You can find custom notification scripts in the PRTG Sensor Hub
