• Company
    • About Us
    • Case Studies
    • Press Center
    • Careers
    • Blog
    • Contact us
  • Contact us
  • Login
 
  • English
    • Deutsch
    • Español
    • Français
    • Italiano
    • Português
Paessler
                    - The Monitoring Experts
  • Products
    • Paessler PRTG
      Paessler PRTGMonitor your whole IT infrastructure
      • PRTG Network Monitor
      • PRTG Enterprise Monitor
      • PRTG Hosted Monitor
      • PRTG UVexplorer
      • PRTG extensionsExtensions for Paessler PRTGExtend your monitoring to a new level
    • Icon Features
      FeaturesExplore all monitoring features
      • Maps & dashboards
      • Alerts & notifications
      • Multiple user interfaces
      • Distributed monitoring
      • Customizable reporting
  • Solutions
    • Industries
      IndustriesMonitor various industry sectors
      • Industrial
      • Healthcare
      • Data Center
      • Education
      • Finance
      • Government
    • IT Topics
      IT TopicsMonitor all areas of IT
      • Network Monitoring
      • Bandwidth Monitoring
      • SNMP Monitor
      • Network Mapping
      • WiFi Monitoring
      • Server Monitoring
  • Pricing
  • Resources
    • Getting Started
      Getting StartedModules for self-paced learning
    • How-to Guides
      How-to GuidesGet the most out of PRTG
    • Videos & Webinars
      Videos & WebinarsLearn from Paessler experts
    • IT  Knowledge
      IT KnowledgeExpand your IT knowledge
    • PRTG Manual
      PRTG ManualFull documentation
    • Knowledge Base
      Knowledge BaseShare community knowledge
    • PRTG Sensor Hub
      PRTG Sensor HubGet sensors, scripts & templates
    • Trainings
      PRTG TrainingLearn how to work with PRTG
  • Partners
    • Icon Handshake
      Become a PartnerFor resellers and channel partners
    • Icon MSP
      Become an MSPDeliver monitoring as a managed service
    • icon partner
      Partner PortalLog in to your partner account
    • Deal Registration
      Deal RegistrationRegister your sales opportunities
    • icon search
      Find a PartnerFind partners selling Paessler products
    • icon technology
      Technology AlliancesSee Paessler technology partnerships
    • Partner HubTools for Your Success
  • Company
    • About Us
    • Case Studies
    • Press Center
    • Careers
    • Blog
    • Contact us
  • Contact us
  • Login
  • English
    • Deutsch
    • Español
    • Français
    • Italiano
    • Português
  • Get a quote
  • Free trial
  1. Home>
  2. Auto-Discovery Setup Guide

Monitor Your Network in Minutes with PRTG’s Initial Auto-Discovery

Get complete visibility across your infrastructure without the manual setup work. PRTG does it for you automatically.

Start configuration

You're evaluating PRTG? 

Auto-discovery gets you to real monitoring data fast so you can see if it fits your environment.

Instead of clicking through devices manually, PRTG scans your network and automatically configures sensors for everything it finds. Routers, switches, servers, VMs, databases, applications. It uses PRTG's library of 300+ pre-built sensor types and applies the ones that match your gear.

  • Live monitoring of your actual infrastructure right away
  • Hundreds of sensors auto-configured for your specific device types
  • Real proof of how PRTG fits your environment and what it can monitor for you
  • A head start when you buy. Your setup is already done.

Let's walk through it.

Before You Start

Make sure you have these items ready for your first Auto-discovery:

Icon Brain

PRTG Installed

Make sure you've downloaded and installed PRTG on a Windows system

icon happy

Credentials Ready

Have login credentials ready for your devices (Windows, SNMP, VMware, etc.)

icon boost

Know Your IP Range

Identify the IPv4 address range you want to scan. Example: 192.168.1.0/24

Set Up Your Initial Auto-Discovery

Log In and Launch Setup

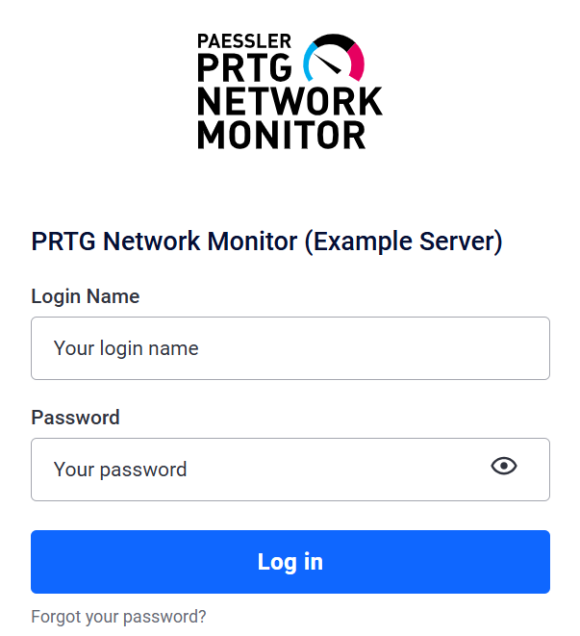
After installation, open the PRTG web interface in your browser. You'll see the login screen.

What to do:
Enter your login name and password, then click Log in.

PRTG automatically launches the smart setup on first login.

PRTG Login screen
PRTG Login screen
PRTG User Credentials

Update Your Admin Credentials

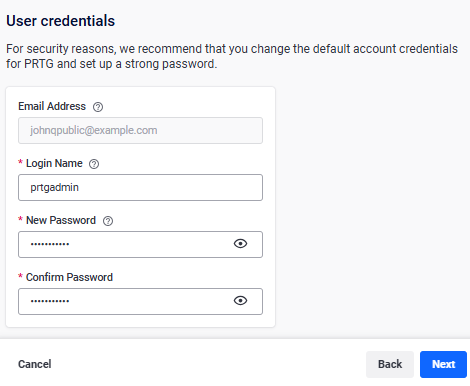
PRTG prompts you to change the default admin account credentials for added security.

What to do:

  • Enter a new Login Name and Password for the PRTG System Administrator account
  • Confirm your email address (used for alerts and password recovery)
  • Click Next

Add System Credentials

This is where you authenticate the devices you want to monitor. PRTG uses these credentials during auto-discovery to identify device types and create the right sensors.

What to do:

  • Click Add system credentials
  • Select the device types from the dropdown (Windows systems, SNMP devices, VMware, Linux/SSH, etc.)
  • Enter the required credentials for each device type
  • Click Next when you're done

Example: To monitor Windows servers, select Credentials for Windows Systems, then enter your domain/computer name, username, and password.

Authenticate Your Systems Credentials
Enter IP Ranges for auto-discovery

Start Auto-Discovery

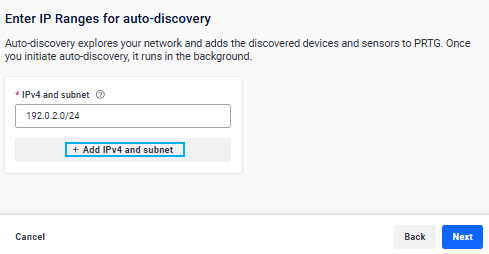
Now comes the core step: telling PRTG which part of your network to scan.

What to do:

  • Enter your network's IPv4 address and subnet in CIDR notation (e.g., 192.0.2.0/24)
  • Want to scan multiple subnets? Click Add IPv4 and subnet to add more ranges
  • Click Next to launch the discovery process

What PRTG scans: PRTG will ping the entire host range defined by your IP addresses and subnet masks (excluding network and broadcast addresses). Reachable devices get added to your device tree.

Configure Web Monitoring

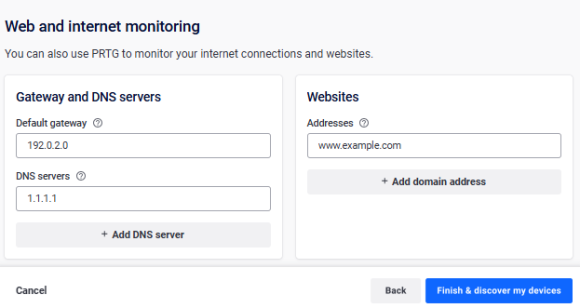
This optional step lets you monitor internet connectivity, DNS servers, and website availability right from the start.

What to do:

  • Gateway and DNS servers: Enter the IPv4 addresses of your default gateway and DNS servers
  • Websites: Add domain names of websites you want to monitor (don't include http:// or https://)
  • Click Add DNS server or Add domain address to monitor multiple targets
  • Click Next when done, or Skip to move on
Web and Internet monitoring
Finish and Start Monitoring

Finish and Start Monitoring

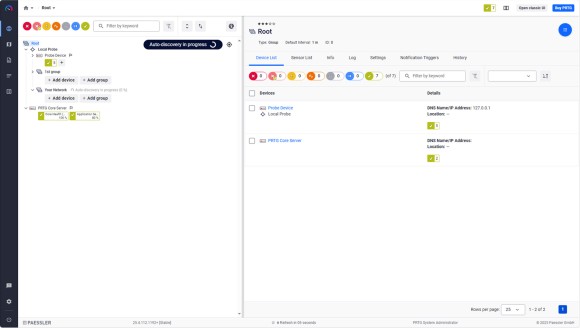
You're done with the setup and the Auto-Discovery starts.

What to do:

  • Click Finish to close setup.

PRTG now runs auto-discovery in the background. Depending on your network size, this might take anywhere from a few minutes to several hours.

The Three Stages of Auto-Discovery

icon

Network Scan

PRTG pings all IP addresses in your defined subnets to find reachable devices.

Icon 2

Device Identification

For every device that responds, PRTG checks what type it is using SNMP, WMI, and other protocols.

Icon 3

Sensor Creation

Based on the device type, PRTG automatically creates the right sensors. Think CPU load, memory, disk space, interface traffic, and more. It uses built-in device templates to figure out what makes sense.

How long does it take?

Small networks (under 100 devices): A few minutes
Larger networks (500+ devices): Up to a few hours

image channel webinar
Logo

Ready to See PRTG's Full Capabilities?

Join a live demo with our monitoring experts. See auto-discovery, alerting, and troubleshooting in action and get your questions answered.

See PRTG in action

Frequently Asked Questions

Auto-discovery didn't find all my devices. What's wrong?

PRTG can only discover devices it can ping. Check these common issues:

  • Firewall blocking ping: Make sure ICMP (ping) is allowed on your devices
  • Credentials missing: If PRTG can't authenticate, it won't identify device types or create sensors. Add credentials via the device Settings tab
  • Wrong subnet: Double-check the IP range you entered. Make sure it covers all network segments you want to scan
Auto-discovery added devices I don't want to monitor. What now?

After discovery finishes, review the device tree and manually delete any unwanted objects. To prevent auto-discovery from re-adding them, either disable auto-discovery for that group or mark specific devices to be skipped.

Once I have my PRTG monitoring set up, can I schedule auto-discovery to run on network segments?

Yes. You can schedule auto-discovery to run automatically on specific network segments at regular intervals. This keeps your monitoring up to date as you add new devices, servers, or network equipment. PRTG will find them and start monitoring without manual intervention.

Discover more

Resource Manuals

How to enable Active Directory authentication 

READ MORE
Resource  KB

How to set up web server monitoring in 3 steps

Read MORE
Resource Blog

Explore PRTG features in our online manual

Open manual

Products

  • Paessler PRTG
    Paessler PRTGMonitor your whole IT infrastructure
    • PRTG Network Monitor
    • PRTG Enterprise Monitor
    • PRTG Hosted Monitor
    • PRTG UVexplorer
    • PRTG extensions
      Extensions for Paessler PRTGExtend your monitoring to a new level
  • Icon Features
    FeaturesExplore all monitoring features

Monitoring with PRTG

  • Network monitoring
  • Bandwidth monitoring
  • SNMP monitoring
  • Network mapping
  • Wi-Fi monitoring
  • Server monitoring
  • Network traffic analyzer
  • NetFlow monitoring
  • Syslog server

Useful Links

  • PRTG Manual
  • Knowledge Base
  • Customer Success Stories
  • About Paessler
  • Subscribe to newsletter
  • PRTG Support
  • PRTG Consulting
  • PRTG Feedback & Roadmap

Contact

Paessler GmbH
Thurn-und-Taxis-Str. 14, 
90411 Nuremberg 
Germany

[email protected]

+49 911 93775-0

  • Contact us
©2026 Paessler GmbHTerms & ConditionsPrivacy PolicyImprintReport VulnerabilityDownload & InstallSitemap
Terms and Conditions Terms and Conditions Terms and Conditions