PRTG Certificate Importer facilita la instalación de un certificado de confianza en su servidor central PRTG para evitar la advertencia del certificado SSL del navegador cuando accede a la interfaz web PRTG.
PRTG ya viene con un certificado SSL por defecto para su servidor web. Con este certificado estándar, todo el tráfico entre su navegador web y su servidor web está cifrado y puede acceder y utilizar de forma segura la interfaz web PRTG a través de HTTPS. Sin embargo, este certificado no coincide con el nombre DNS o la dirección IP de su servidor PRTG, por lo que su navegador siempre mostrará un mensaje de advertencia de certificado SSL cuando se conecte a PRTG.
Para evitar esta advertencia, puede utilizar un certificado de confianza. Si tiene una autoridad de certificado (CA) en su red, puede crear su propio certificado de confianza que coincida con la dirección IP interna de su servidor central PRTG. Si accede a PRTG desde direcciones IP externas o nombres DNS, puede solicitar un certificado de confianza a emisores como GoDaddy, DigiCert o InstantSSL, e importarlo a su instalación de PRTG.
Desafortunadamente, la importación manual de un certificado SSL emitido en una instalación de PRTG es a veces un poco complicada e incómoda. PRTG necesita varios archivos de certificado que se nombren correctamente y que tengan los datos en la codificación y el formato esperados. No siempre es fácil comprender qué archivos de certificado deben proporcionarse y en qué formato.
Por ello, para facilitar la instalación de un certificado de confianza, le proporcionamos de forma gratuita PRTG Certificate Importer. Combina y convierte automáticamente todos los archivos emitidos por una autoridad de certificado (CA) para su uso con PRTG y guarda los archivos de certificado en la ruta correcta de su instalación de PRTG. Esto hace que la importación de un certificado SSL de confianza sea bastante cómoda
Y, por supuesto, nos encantaría conocer su opinión sobre el PRTG Certificate Importer gratuito.
Para obtener una conexión de confianza y evitar la advertencia del navegador cuando acceda a su interfaz web PRTG sin complicados pasos de configuración, sólo tiene que solicitar un certificado de una CA válida y PRTG Certificate Importer:
Puede importar archivos de certificado con uno de los siguientes formatos: .cer, .crt, .der, .p12, .p7b, .pem, .pfx o .txt (a través del portapapeles). PRTG Certificate Importer no admite archivos .csr (solicitudes de firma de certificados)
Hemos diseñado PRTG Certificate Importer para facilitarle al máximo la instalación de certificados SSL de confianza
en su servidor central PRTG. En el mejor de los casos, sólo tiene que proporcionar la ruta a su paquete de CA descargado y dejar que nuestra herramienta
haga el resto.
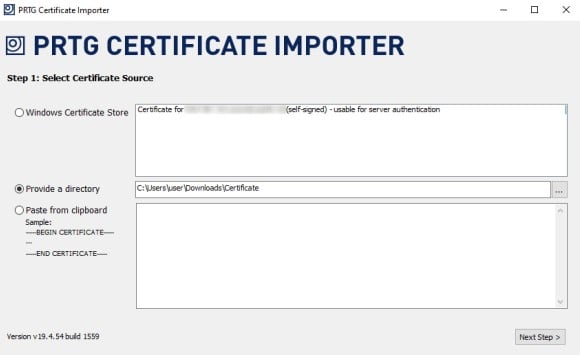
Abra PRTG Certificate Importer desde el menú Inicio de Windows para iniciar PRTG Certificate Importer y elija la fuente de su certificado:
Haga clic en "Siguiente paso" para importar el certificado. PRTG Certificate Importer comprueba si el certificado proporcionado es válido. Si esta validación falla, verá un mensaje de error correspondiente con el motivo. Certificate Importer continúa con el paso 2 si la clave privada del certificado está protegida con una contraseña. En caso contrario, el importador omite el paso 2 y salta directamente al paso 3.
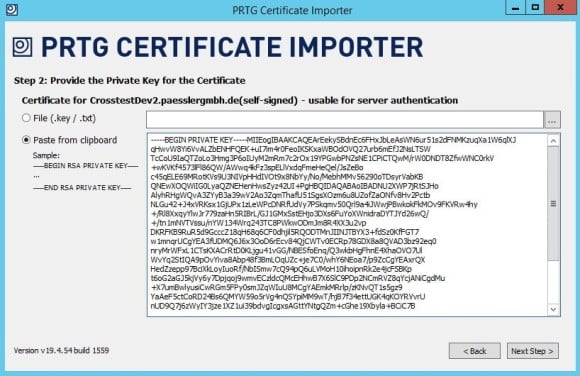
Si la clave privada está separada de su certificado, PRTG Certificate Importer le pedirá que proporcione la clave privada que viene junto con sus archivos de certificado. Puede proporcionar un archivo que contenga su clave (puede ser .key o .txt), o copiarla y pegarla directamente. Haz clic en "Siguiente paso".
Si tu clave privada está protegida con una frase de contraseña, se te pedirá que introduzcas la frase de contraseña de tu clave en el cuadro de diálogo que aparece. Haz clic en "Aceptar" para continuar.
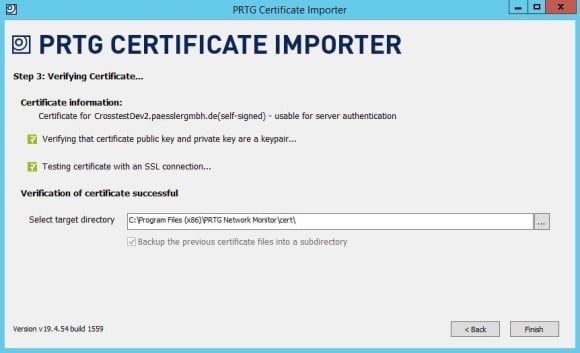
PRTG Certificate Importer comprueba si su certificado y la clave privada son un par válido y prueba el certificado con una conexión SSL. Si la verificación del certificado se realiza correctamente, puede elegir el directorio de destino para el certificado.
Para trabajar con PRTG, el certificado debe almacenarse en la subcarpeta \cert del directorio del programa PRTG.
PRTG Certificate Importer moverá automáticamente los archivos existentes de la subcarpeta \cert a un nuevo subdirectorio. Si algo va mal, puede volver a sus antiguos certificados de esta manera.
Haga clic en "Finalizar" para reiniciar el servidor central PRTG con su nuevo certificado de confianza.
Cuando se conecte a la interfaz web PRTG, su navegador ya no mostrará la advertencia del certificado SSL
Advertencia de certificado SSL.
PRTG Certificate Importer (4.5 MB)
Este programa gratuito se proporciona a los clientes de Paessler para instalar certificados SSL de confianza en los servidores web de PRTG. Por favor, comprenda que sólo podemos proporcionar un soporte limitado para esta herramienta.