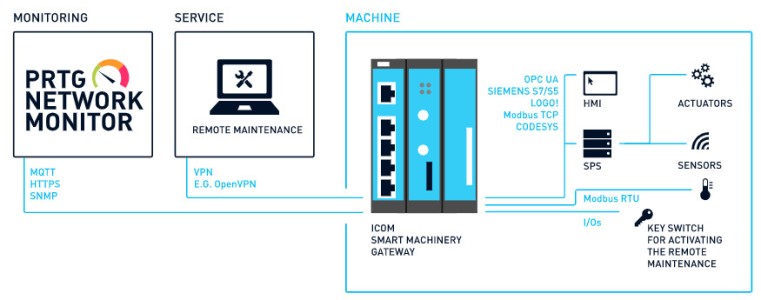
En el ámbito del Internet industrial de las cosas (IIoT), una pasarela es esencialmente una conexión entre diferentes componentes de la planta de producción, por ejemplo actuadores y sensores, y diversos operadores como sistemas ERP o SCADA, servicios o fabricantes. Las pasarelas pueden realizar diferentes funciones, como la adquisición de datos, el procesamiento de datos o la conversión de protocolos.
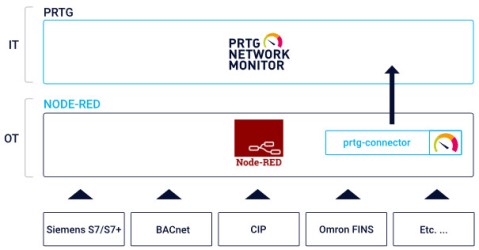
Pero, ¿cómo puede introducir datos tan complejos en PRTG para monitorear su entorno de tecnología operativa (OT)? Aquí es donde entra en juego el conector Node-RED de PRTG.
Node-RED es una herramienta de programación que proporciona un editor de flujo basado en navegador para conectar flujos de datos que luego se pueden implementar con un solo clic. La herramienta ofrece una amplia gama de componentes preconfigurados para varios protocolos de comunicación, así como funciones generales de adquisición, procesamiento y transferencia de datos.
Dado que el preprocesamiento de datos puede ser bastante complejo, muchas pasarelas IIoT tienen una funcionalidad Node-RED nativa. Junto con el conector PRTG Node-RED, puede recopilar datos de cientos de aplicaciones, sistemas y protocolos diferentes, procesar estos datos y, a continuación, reenviarlos a PRTG.
En esta guía, queremos mostrarle cómo configurar Node-RED, instalar el conector PRTG Node-RED, configurar sus nodos prtg-connector que se utilizan para reenviar los datos a PRTG, y configurar un sensor Datos push IoT (avanzado) (HTTP) en PRTG que muestre los datos entregados.
Nota: Este tutorial pretende ser un resumen general de la implementación de Node-RED y el conector PRTG Node-RED. Para configuraciones de flujo completas para proveedores de gateways específicos, consulte nuestros resúmenes de gateways.
Node-RED proporciona documentación fácil de usar para su proceso de instalación y ejecución, por ejemplo:
Obtenga visibilidad total con paneles en tiempo real, alertas y sensores personalizables
Puede instalar el conector PRTG Node-RED a través de la paleta Node-RED, GitHub o npm. La instalación es gratuita.
Busque paesslerag-node-red-contrib-prtg en Gestionar paleta -> Instalar
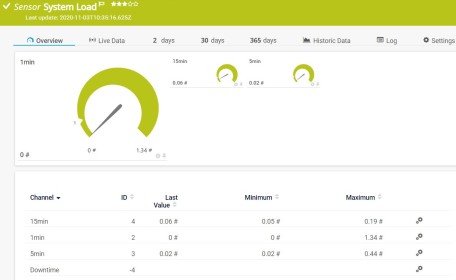
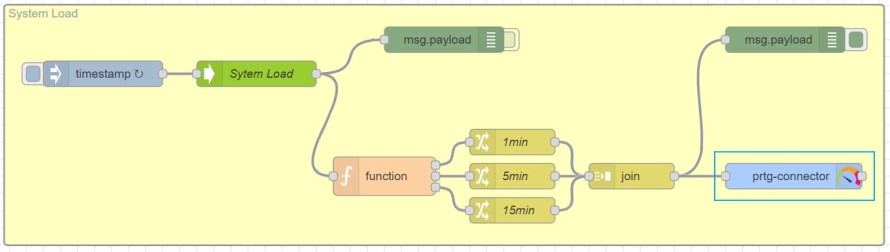
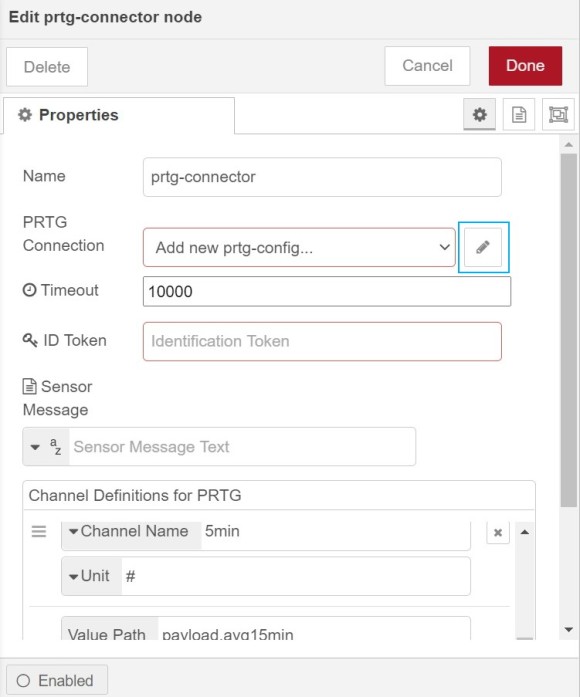
Por supuesto, cada flujo de procesamiento de datos que cree y configure con Node-RED tiene un propósito y una función diferentes. Lo que todos estos flujos deben tener en común, sin embargo, es un nodo prtg-connector al final que necesita para reenviar sus datos a PRTG. Aquí puede ver un ejemplo de flujo de carga del sistema:
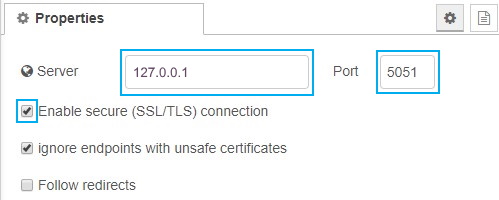
3. En el campo Servidor, introduzca la dirección IP o el nombre DNS de su servidor PRTG.
4. En el campo Puerto, introduzca 5051. Este número de puerto corresponde al puerto SSL/TLS del sensor HTTP IoT Push Data Advanced que necesita configurar en PRTG más tarde. Debido a que este sensor sólo puede escuchar solicitudes HTTPS entrantes en este puerto, no puede introducir ningún número de puerto distinto de 5051 aquí.
5. También asegúrese de activar la casilla junto a Activar conexión segura (SSL/TLS). Esto es necesario porque si clona flujos que incluyen el nodo prtg-connector, Node-RED desactiva esta opción por razones de seguridad.
6. Haga clic en Añadir para guardar la configuración.
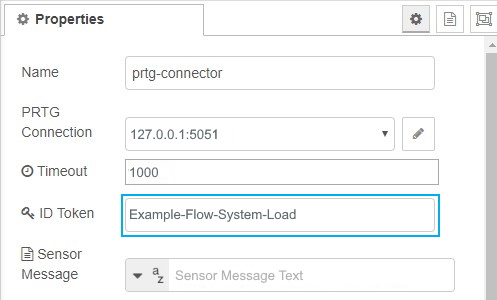
7. En el campo Conexión PRTG, ahora puede ver la dirección IP o el nombre DNS de su servidor PRTG, así como el puerto.
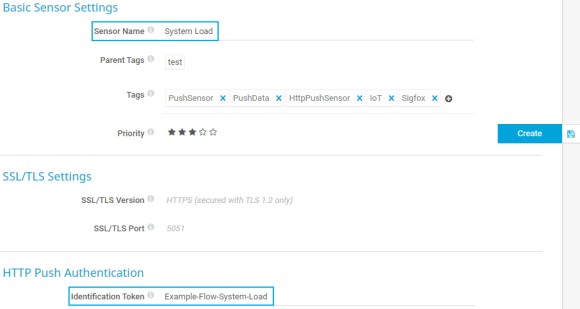
8. Para el campo ID Token, tiene dos opciones:
a) Introduzca aquí su propio token de identificación. Puede ser cualquier cadena. Más tarde tendrá que copiar el token al sensor HTTP IoT Push Data Advanced en PRTG.
b) Primero configure un sensor HTTP IoT Push Data Advanced en PRTG. PRTG crea automáticamente un token de identificación para este sensor que puede copiar de la configuración del sensor y pegarlo aquí.
En este tutorial, utilizamos la opción a).
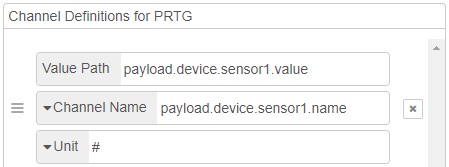
9. En Definiciones de canal para PRTG, defina los canales que muestra el sensor HTTP IoT Push Data Advanced. Introduzca un Nombre de canal significativo y una Unidad para este canal. La unidad puede ser una cadena o un marcador de posición.
10. Haga clic en Listo para finalizar la configuración del prtg-conector
Las alertas personalizadas y la visualización de datos le permiten identificar y prevenir rápidamente todo tipo de problemas
Ahora necesita crear el sensor en PRTG que se conecta al nodo prtg-connector configurado y muestra los respectivos datos de monitoreo.
6. Haga clic en Crear para añadir el sensor. Al poco tiempo, PRTG crea los canales y el sensor muestra los primeros datos.
Y ¡ya está! Sólo tiene que repetir los pasos para los distintos datos que su puerta de enlace proporciona y que desea mostrar en PRTG. Node-RED y el conector PRTG Node-RED le proporcionan una forma bastante fácil y eficiente de compartir datos de monitoreo entre entornos OT y TI.