Obtenha visibilidade total com painéis em tempo real, alertas e sensores personalizáveis
Você configurou o PRTG em sua rede interna com seu endereço IP privado, por exemplo, 192.168.0.100. Tudo está funcionando bem, mas agora você também quer ser capaz de alcançar o seu servidor central do PRTG através da Internet a partir de um sistema diferente de onde a sua instalação do PRTG está sendo executada. Para o monitoramento de rede móvel, você quer usar os aplicativos PRTG para iOS ou Android também.
Antes de poder fazer isso, no entanto, você precisa ter certeza de que seu servidor central do PRTG pode ser acessado a partir do mundo exterior e também através do seu firewall.

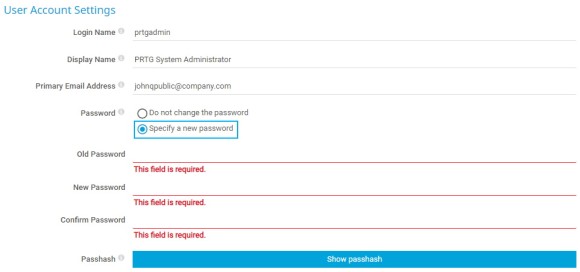
Porque a segurança vem em primeiro lugar, você precisa ter certeza de que ninguém mais é capaz de logs em sua instalação PRTG. Para fazer isso, você precisa alterar a senha para a conta de usuário do Administrador do sistema PRTG (este é prtgadmin por padrão), se você ainda não tiver feito isso.
Para verificar se você ainda está usando a senha padrão, basta selecionar Configuração | Configurações de conta | Minha conta no menu principal na interface da Web PRTG e ir para a seção Configurações de conta de usuário. Se os campos Nome de login e Senha estiverem pré-preenchidos com prtgadmin, clique em Especificar uma nova senha para alterar a senha de acordo.
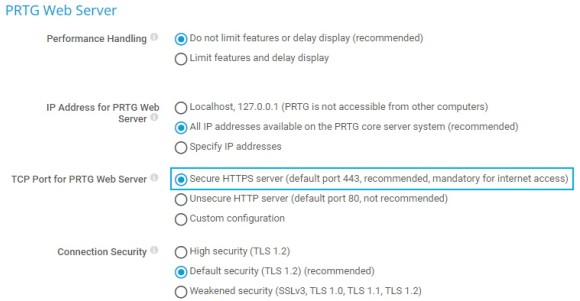
Então, porque você não quer acessar a sua instalação através da Internet usando HTTP inseguro, você precisa se certificar de que você configure o PRTG para usar HTTPS para todas as conexões com a interface da Web PRTG. HTTP também é possível, mas nós não o recomendamos.
Para fazer isso, vá para Configuração | Administração do Sistema | Interface da Web PRTG, seção Servidor Web PRTG, e selecione Servidor HTTPS seguro como porta do Protocolo de Controle de Transmissão (TCP) para solicitações de entrada de páginas da Web.
Opcionalmente, você pode configurar um nome DNS que corresponda ao endereço "público" desejado que você usa para acessar a interface da Web PRTG, por exemplo, prtgserver.mydomain.tld. Digite o nome DNS em Configuração | Administração do Sistema | Interface do Usuário, seção Interface da Web PRTG.
O PRTG vem com um certificado SSL que é autoassinado. Se você configurou o servidor Web do PRTG para usar HTTPS, seu navegador mostra um aviso de certificado quando você acessa a interface da Web PRTG. Para remover este aviso, você precisa obter o seu próprio certificado confiável de uma autoridade de certificação (CA). Para obter mais informações, consulte Usando seu próprio certificado SSL com o servidor Web PRTG no Manual do PRTG.
Para acessar a sua instalação PRTG a partir do exterior, você precisa abrir ou encaminhar as portas necessárias em seu firewall. A solução é fazer regras de Network Access Translation (NAT) para essas portas.
A especificação das regras NATS em seu firewall pode ser bastante diferente, dependendo do fornecedor que você usa. Portanto, verifique a documentação correspondente que vem com seu dispositivo ou modelo.
Em nosso exemplo, com o PRTG sendo executado em um servidor com o endereço IP 192.168.0.100, as regras NATS poderiam ser algo como isto:
A regra para HTTP é opcional, mas facilita muito as coisas. Se você digitar prtgserver.mydomain.tld em seu navegador, ele tentará primeiro acessar o site usando HTTP. Observe que, se não quiser criar a regra NAT para HTTP, você deverá digitar https://prtgserver.mydomain.tld todas as vezes.
Certifique-se também de que seu Firewall do Windows esteja desativado no servidor central do PRTG ou que você tenha criado as regras relevantes.
E é isso! Agora você pode monitorar sua instalação PRTG enquanto estiver em movimento com os aplicativos PRTG para iOS ou Android ou acessar a interface da Web PRTG de outros clientes através da Internet.
Alertas personalizados e visualização de dados permitem identificar e prevenir rapidamente qualquer tipo de problema
Se você decidir instalar uma ou mais sondas remotas clássicas (consulte o nosso guia de instruções) fora da sua LAN para monitorar sua rede a partir de diferentes locais, essas sondas remotas iniciam a conexão com o servidor central do PRTG.

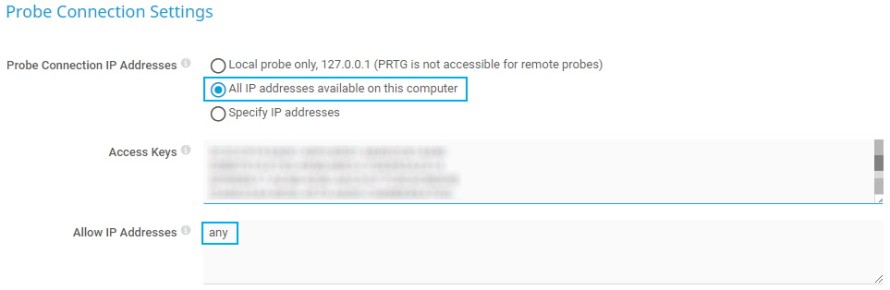
Esta é a razão pela qual você precisa permitir que o servidor central do PRTG aceite conexões de entrada de sondas remotas.
Em sua instalação do PRTG, vá para Configuração | Administração do Sistema | Core & Sondas. Na seção Configurações de conexão de sonda, selecione Todos os endereços IP disponíveis neste computador para especificar que o servidor aceita todos os endereços IP para conexões de sonda de entrada.
Para Permitir endereços IP, insira os endereços IP dos clientes nos quais deseja instalar suas sondas remotas ou insira qualquer um para permitir qualquer endereço IP.
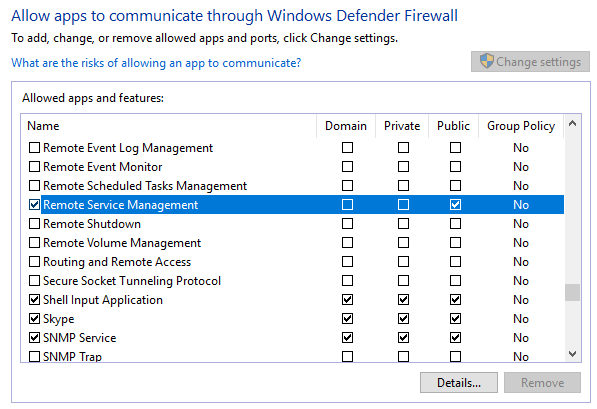
Também é necessário permitir que as sondas remotas se comuniquem por meio do Firewall do Windows. As etapas a serem seguidas podem ser bem diferentes.
Aqui está um exemplo para o Windows 10:
Nas configurações do Firewall do Windows Defender, clique em Permitir um aplicativo por meio do firewall. Na janela que se abre, clique em Alterar configurações. Marque as caixas de seleção ao lado de Remote Service Management e Public na respectiva linha. Clique em OK para salvar suas configurações.
Como as sondas remotas iniciam a conexão com o servidor central do PRTG, você também precisa abrir ou encaminhar a porta que é usada para conexões com sondas remotas clássicas em seu firewall. Essa é a porta TCP 23560 por padrão.
Crie a seguinte regra NATS:
Pronto! Agora você também pode usar sondas remotas clássicas para monitorar locais remotos, por exemplo, suas filiais, sem firewalls que impeçam as conexões.


