Obtenha visibilidade total com painéis em tempo real, alertas e sensores personalizáveis
Por padrão, o PRTG envia notificações via e-mail. Quando você instala o produto, o PRTG pede que você forneça um endereço de e-mail que ele usa para essa finalidade também.
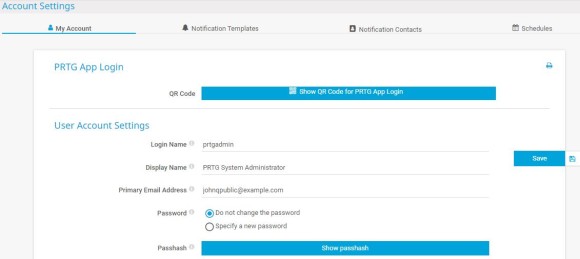
Você pode alterar o endereço de e-mail a qualquer momento. Basta navegar para Configuração | Configurações da conta | Minha conta na interface da Web PRTG e alterar o endereço de e-mail principal.
Então, o que você precisa considerar ao configurar as notificações? Aqui estão as respostas.
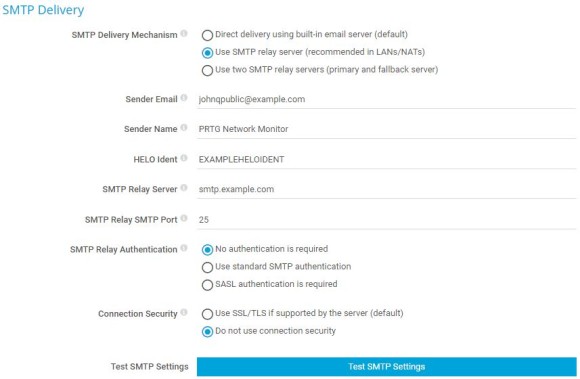
Para notificações por e-mail, você pode usar o servidor de retransmissão de e-mail integrado ou configurar seu próprio servidor de retransmissão SMTP para enviar e-mails. Se você quiser usar notificações por SMS, você também precisa definir as configurações para a entrega de SMS.
Nota: Algumas dessas opções não estão disponíveis no PRTG Hosted Monitor.
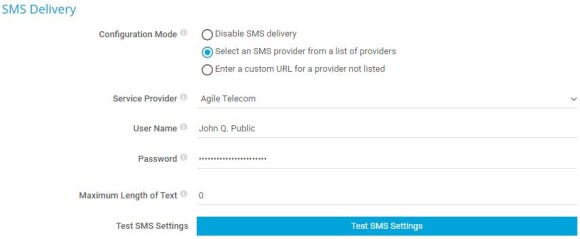
3. Defina as configurações de entrega de SMS, se necessário.
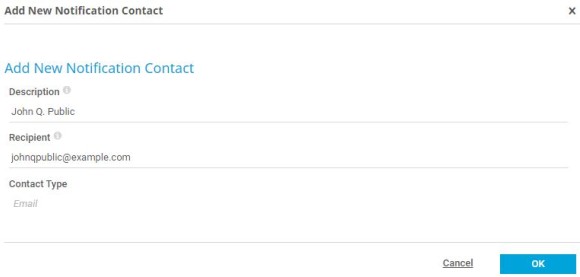
Crie contatos de notificação para especificar como receber notificações. Os destinatários podem ser endereços de e-mail, números de telefone ou dispositivos push (com os aplicativos PRTG para iOS ou Android).
Alertas personalizados e visualização de dados permitem identificar e prevenir rapidamente qualquer tipo de problema
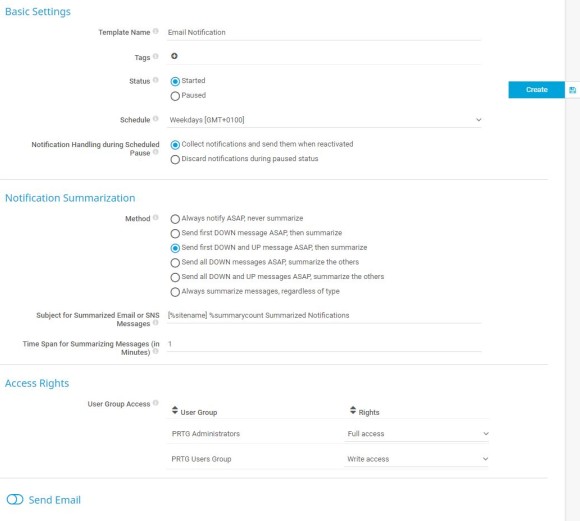
Defina notificações específicas da conta do usuário usando modelos de notificação. É possível usar mais de um método de notificação em cada modelo de notificação.
Observação: normalmente, há três tentativas sucessivas de entrega de uma notificação. Se todas essas tentativas falharem, a notificação será perdida. Para nunca perder uma notificação, recomendamos que você sempre configure pelo menos duas notificações com métodos de notificação diferentes, por exemplo, uma notificação por e-mail e uma notificação por SMS. Se a entrega via e-mail falhar, o PRTG ainda pode notificá-lo via smartphone como um fallback.

3. Passe o mouse sobre a roda dentada do ícone e selecione Add Notification Template (Adicionar modelo de notificação ) para adicionar um novo modelo de notificação ou clique no nome de um modelo de notificação existente para editá-lo.
4. Digite um nome significativo para o modelo de notificação, por exemplo, um nome que inclua os métodos de notificação que você selecionar.
5. Selecione como deseja tratar as notificações durante uma pausa cronograma do modelo de notificação. Você pode Coletar notificações e enviá-las quando reativadas ou Descartar notificações durante o status de pausa.
6. Opcionalmente, selecione um Cronograma para ativar as notificações somente em horários específicos, por exemplo, nos dias úteis. Para evitar inundações de mensagens, você pode escolher entre várias opções de Resumo da notificação. Além disso, é possível definir o acesso do grupo de usuários a esse modelo de notificação, se necessário.
7. Selecione um ou mais métodos de notificação. Para fazer isso, ative o método de notificação e insira as respectivas configurações. Para obter mais informações sobre os métodos de notificação e sua configuração, consulte o Manual do PRTG: Modelos de notificação.
8. Clique em Criar para salvar suas configurações.
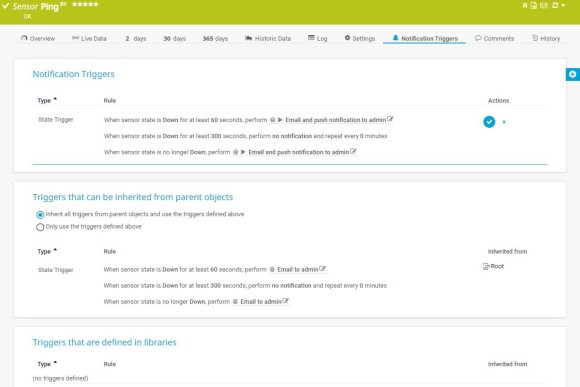
O PRTG aciona notificações com base no status de um sensor ou nos limites de valor de um sensor que são violados. Quando os valores de um sensor mudam, os acionadores de notificação fazem com que o PRTG envie uma ou mais notificações ou execute outras ações que você especificou em seus modelos de notificação.
Existem vários acionadores de notificação disponíveis, por exemplo, acionadores de estado ou acionadores de velocidade. Para obter informações detalhadas sobre acionadores de notificação e suas configurações, consulte o Manual do PRTG: Configurações de acionadores de notificação.
Você pode adicionar acionadores de notificação a todos os objetos de monitoramento, como sondas, grupos, dispositivos ou sensores individuais, e também a conjuntos personalizados de sensores, as chamadas bibliotecas. Para fazer isso, execute as seguintes etapas:
Agora você pode testar a notificação que criou. Você tem duas opções. Acionar imediatamente uma notificação para fins de teste ou simular um status de erro de um sensor para o qual você configurou um acionador de notificação.
Nota: Se você não receber uma notificação ou se uma ação definida não for executada, verifique os logs de notificação. Para isso, selecione Logs | Eventos do sistema | Notificação relacionada no menu principal. Procure a notificação acionada na lista da tabela e verifique se você configurou corretamente as definições de entrega de notificação.
E é isso! Se receber muitas notificações, revise seu trabalho. Talvez seja necessário revisar os objetos para os quais você configurou acionadores de notificação e verificar também as configurações de herança. Ou talvez seja necessário definir configurações de compactação de notificações ou cronogramas para ativar as notificações somente durante períodos específicos da semana.


