In una configurazione complessa di monitoraggio della rete, di solito non si vuole che ogni utente sia in grado di accedere a tutti gli oggetti della configurazione. Ciò può diventare ancora più importante se si è un Managed Service Provider (MSP) che gestisce diversi clienti in un'unica installazione di PRTG.
Naturalmente, un cliente dovrebbe avere accesso ai propri dispositivi, mappe o rapporti, ad esempio, ma non dovrebbe essere in grado di vedere o accedere ai dispositivi, mappe o rapporti di un altro cliente. È qui che entra in gioco la gestione dei diritti di accesso di PRTG Network Monitor. In questa guida vi mostriamo, in qualità di MSP, come definire i diritti di accesso per più clienti.
Ottieni una visibilità completa con dashboard in tempo reale, avvisi e sensori personalizzabili
I singoli utenti sono organizzati in gruppi di utenti:
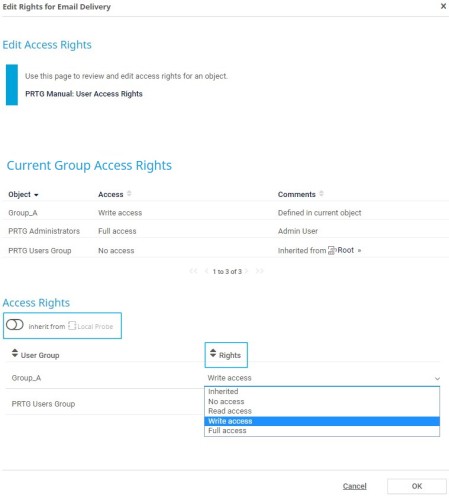
I diritti di accesso ai singoli oggetti dell'albero dei dispositivi, ad esempio ai dispositivi o ai sensori, nonché alle librerie, alle mappe e ai rapporti, sono determinati a livello di gruppo.
Gli effettivi diritti di accesso dei gruppi ai singoli oggetti sono definiti nelle impostazioni di un oggetto. Possono essere definiti localmente o ereditati da oggetti che si trovano più in alto nell'albero dei dispositivi.
Gli utenti possono avere anche diritti di accesso specifici. Esistono utenti di sola lettura e utenti di lettura/scrittura. I diritti di accesso degli utenti in sola lettura prevalgono sempre sui diritti di accesso dei gruppi. Ciò significa che anche se un utente di sola lettura appartiene a un gruppo di utenti con accesso in scrittura a un oggetto, ha comunque accesso solo in lettura.
Gli utenti che fanno parte di un gruppo di amministratori hanno sempre i diritti di amministratore. Ciò significa che hanno accesso completo ovunque. Possono anche creare e gestire account utente e gruppi di utenti. Gli utenti di sola lettura non possono essere membri di un gruppo di amministratori.
Ogni utente deve essere membro di un cosiddetto gruppo primario, in modo che non ci sia nessun utente senza appartenenza al gruppo. Può essere membro anche di altri gruppi di utenti, ma non c'è alcuna differenza nell'esperienza dell'utente tra un gruppo primario e altri gruppi di utenti. Solo gli amministratori possono assegnare un gruppo primario a un utente.
Prima di tutto, pensate a come volete gestire i clienti nella vostra installazione di PRTG.
I casi d'uso possono essere diversi, quindi per ora supponiamo che si lavori con sonde remote.
Procedete come segue per preparare la gestione dei diritti di accesso:
Installare una sonda remota per cliente.
Per ulteriori informazioni, vedere Come installare una sonda remota PRTG in 4 passaggi.
Impostare l'albero dei dispositivi come richiesto dal cliente.
Per ulteriori informazioni, vedere anche Come impostare manualmente l'albero dei dispositivi in 3 passaggi.
Pianificate la gestione dei diritti di accesso insieme al vostro cliente. Chiedetevi:
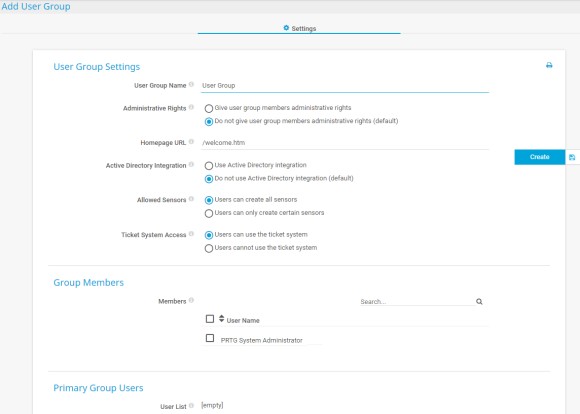
Ora è il momento di aggiungere i gruppi di utenti di cui il cliente ha bisogno. È possibile creare gruppi di utenti PRTG o integrare gruppi Active Directory in PRTG.
Tenere presente che gli utenti non possono essere membri di entrambi i tipi di gruppi di utenti contemporaneamente. Utilizzare un solo tipo di gruppo di utenti per ridurre al minimo il lavoro di amministrazione. In questo caso, creeremo un gruppo di utenti PRTG. Per aggiungere gruppi Active Directory, consultare la sezione Integrazione di Active Directory nel Manuale PRTG.
Ora è possibile vedere un nuovo gruppo nell'albero dei dispositivi con il nome [nome_gruppo] home. Per impostazione predefinita, i membri di questo gruppo di utenti non hanno accesso agli oggetti dell'albero dei dispositivi, alle librerie, alle mappe o ai rapporti, a meno che non abbiano diritti amministrativi.
Avvisi personalizzati e visualizzazione dei dati ti aiutano a identificare e prevenire rapidamente ogni tipo di problema
Dopo aver creato i gruppi di utenti, aggiungere gli account utente di cui il cliente ha bisogno e assegnare gli utenti ai gruppi di utenti corrispondenti. In questo caso, utilizzeremo gli account utente locali.
Per aggiungere utenti di Active Directory, consultare la sezione Integrazione di Active Directory nel Manuale PRTG.
Andare in Configurazione | Amministrazione del sistema | Account utente. Passare sopra la ruota dentata e selezionare Aggiungi utente.
Inserire un nome di accesso, un nome visualizzato, l'indirizzo e-mail principale dell'utente e definire una password per l'utente.
In Tipo di account, definire se l'utente è un utente di lettura/scrittura o di sola lettura. Tenere sempre presente le regole per i diritti di accesso in PRTG!
In Riconoscimento degli allarmi, definire se l'utente può riconoscere gli allarmi. Questa opzione è visibile solo se in precedenza è stato selezionato Utente di sola lettura.
In Modifica password, definire se l'utente può modificare la password del proprio account. Questa opzione è visibile solo se in precedenza è stato selezionato Utente di sola lettura.
In Gruppo primario, selezionare il gruppo primario per questo utente dall'elenco dei gruppi di utenti.
Nella sezione Sistema di ticket, alla voce Notifiche e-mail, selezionare se l'utente può ricevere e-mail dal sistema di ticket.
Lasciare invariate tutte le altre impostazioni e fare clic su Crea.

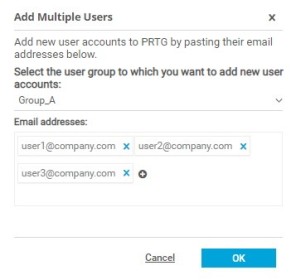
Naturalmente, è possibile aggiungere più utenti in batch. Selezionare Aggiungi più utenti e scegliere un gruppo di utenti esistente dall'elenco dei gruppi di utenti, quindi inserire gli indirizzi e-mail per i quali si desidera creare gli account utente.
Tenere presente che non è possibile definire i diritti di accesso dei singoli utenti (utente in lettura/scrittura o utente in sola lettura) quando si aggiungono più utenti contemporaneamente. Questo può essere fatto solo negli account utente specifici.
Ora è possibile definire i diritti di accesso per gli oggetti dell'albero dei dispositivi (sensori, dispositivi, gruppi o sonde), delle librerie, delle mappe e dei rapporti.
E il gioco è fatto! Ora si può procedere alla messa a punto della gestione dei diritti di accesso per tutti gli altri utenti, gruppi di utenti e oggetti.