
.jpg) Originally published on March 13, 2017 by Jasmin Kahriman
Originally published on March 13, 2017 by Jasmin Kahriman
Last updated on January 23, 2024
•
15 minute read
The Simple Network Management Protocol (SNMP), that has accompanied IT professionals for decades, is available on a large number of devices and solutions. This is great because it's one of the most basic technologies for monitoring and other network management tasks. Although SNMP won't fix the internet for you, you won't come across SNMP if you are a system administrator and responsible for IT infrastructure.
There are several things to consider when configuring SNMP for monitoring. The first and most important step is: Enable SNMP! How enabling SNMP works on computers and servers with Windows, Linux, and macOS operating systems is something we'll show you in this article.

Overview
Enabling SNMP on Windows
Step 1: Install SNMP
Installing and configuring the SNMP service on the different Windows client and server versions mostly works the same way. You can do it using GUI (Graphical Unit Interface) or via PowerShell. We will show you both methods.
On Windows versions older than Windows 8 and Windows Server 2012, it is already installed. For Windows 8, Windows 10, Windows 11, Windows Server 2012, Windows Server 2016, Windows Server 2019 and Windows Server 2022 you will have to install the SNMP service first.
If you are running Windows 7, Windows 8/8.1, or Windows 10 up to version 1804, you can enable SNMP via Control Panel. Here's how:
- Right on the Start Menu and then click Programs and Features.
- On the left side click on Turn Windows features on or off.
- Select Simple Network Management Protocol (SNMP) to install it and then click OK.
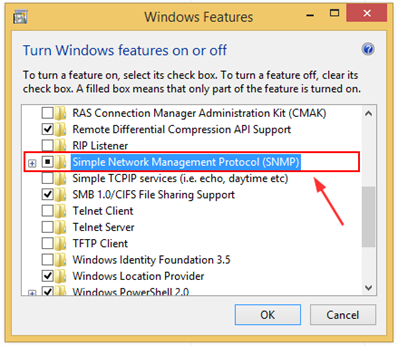
Your SNMP is installed, and you need to configure it.
If you are running Windows 10 version 1809 and onwards, or Windows 11, you can install SNMP only via PowerShell and not through Control Panel. This change was implemented because Microsoft deprecated SNMP and removed it from Control Panel. However, they still provide an option to install it via PowerShell.
- Run PowerShell as Administrator
- Type Add-WindowsCapability -Online -Name “SNMP.Client~~~~0.0.1.0“ and press Enter to install SNMP.
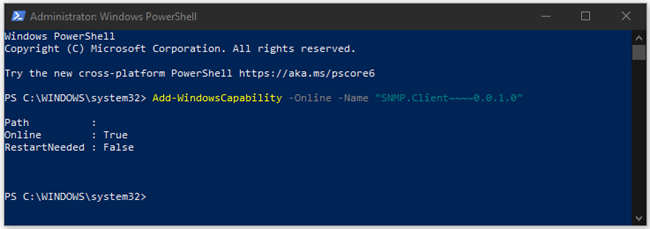
That's it. You successfully installed SNMP.
If you are running Windows Server 2012 R2 and onwards, including Windows Server 2022, you can install SNMP using PowerShell (similarly to Windows) or through Server Manager (GUI). In this guide, we will demonstrate how to do it using the GUI interface.
- Open Server Manager.
- Click on Add roles and features.

- Under Before you begin, click Next.
- Under Select installation type, select Role-based or feature-based installation and click Next.
- Under Select destination server, click Next.
- Under Select server roles, click Next.
- Under Select features, select SNMP Service, and then confirm by clicking on Add Features.
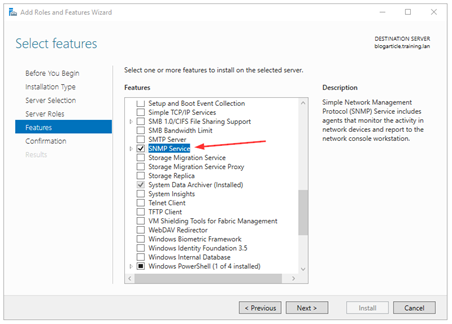
- Click Next and then, Install.
That's it! You have successfully installed SNMP on Windows Server 2022.
Step 2: Configure SNMP
After you have installed SNMP, the next step is to configure it appropriately. To do this, follow these steps for both Windows and Windows Server.
- Open the Services applet by searching for "services.msc" or entering it in the Run command.
- Navigate to SNMP Service, right click and select Properties.
- Under General, choose Automatic as startup type to have the service always running, even after turning your computer off and on again.
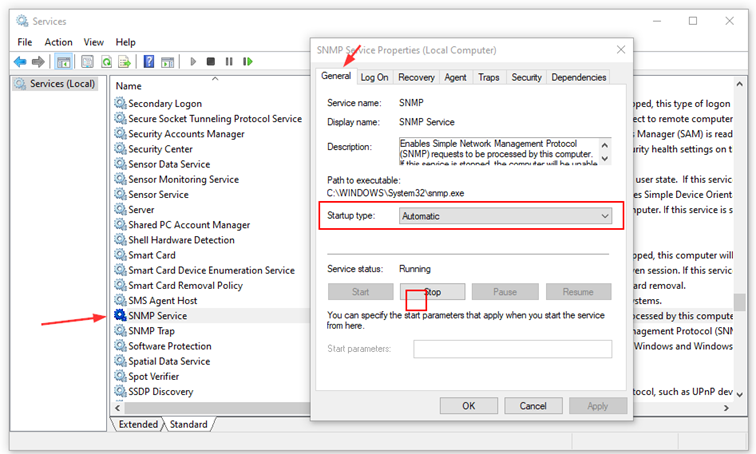
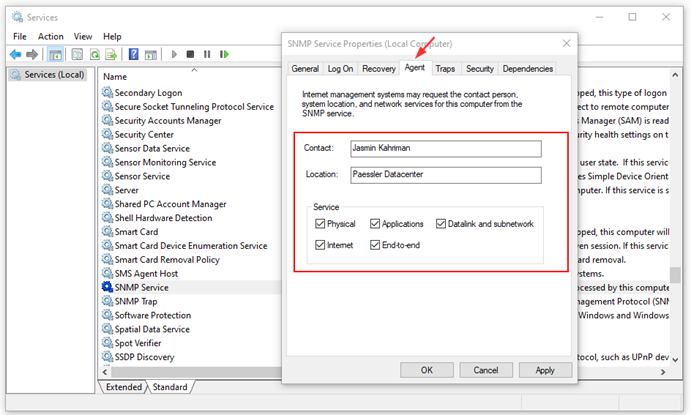
- Navigate to the Agent tab and check if all services listed have enabled SNMP values available.
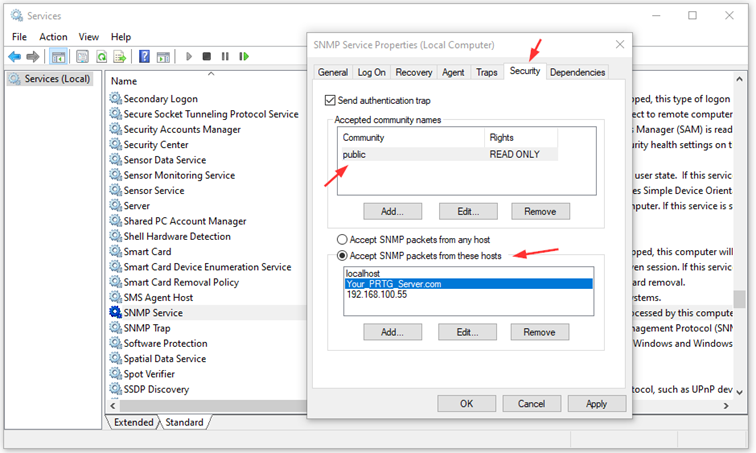
- Navigate to the Security tab and configure SNMP settings, including the community string and the IP/host filter list, according to your security compliance requirements. For example, add the community name "public" with READ ONLY rights and allow SNMP packets from at least the address of your monitoring server.
That's it! You have successfully configured SNMP on your Windows machine.

Enabling SNMP on Linux
Now look at how you can enable SNMP on Linux. We describe the setup process for Ubuntu, Debian, CentOS and OpenSuse.
In the first step you need to install the SNMP deamon
| Ubuntu/Debian | sudo apt-get install snmp snmpd snmp-mibs-downloader |
| CentOS | Sudo dnf install net-snmp |
| OpenSuse | Zypper install net-snmp snmp-mibs |
You will now find the SNMP configuration in /etc/snmp/snmpd.config. Make a backup of the original configuration file and open snmpd.config with an editor. Now set the community string.
| Ubuntu/Debian | rocommunity public |
| CentOS | com2sec default public |
| OpenSuse | rocommunity public |
public is the default community string that most SNMP devices listen to. Of course you can also choose a string individually. The only important thing is that the string is also the same on the devices to be queried.
If you are using OpenSuse, the snmpd service may not be activated and started by default. In this case, activate the snmpd service so it will start on system boot with the command: systemctl enable snmpd. Then start the service with the command systemctl start snmpd.
For other Linux distributions you might have to adjust the steps mentioned above slightly.
Enabling SNMP on macOS
Current macOS versions include SNMP by default. You can use the basic setup assistant to appropriately configure SNMP on your Mac:
- Open a new terminal and use this command:
- sudo snmpconf -g basic_setup
Configure read-only community access for SNMP v1/v2c by answering the setup questions and start the SNMP daemon:
- sudo launchctl load -w /System/Library/LaunchDaemons/org.net-snmp.snmpd.plist
Best practice is to add your SNMP daemon to automatic startup to manage the macOS machine via SNMP in a comfortable way.
What's Next?
Enabling SNMP on your operating system wasn't so hard, was it? Configuring access from other servers to useful system parameters via SNMP might be harder. We will cover this topic in the next articles about SNMP on our blog. Stay tuned!


